Category: AI

  • AI Keyword Generator

    This AI Keyword Generator workflow template is designed for marketers, SEO specialists, and content creators who need to quickly generate high-quality keyword lists for their content strategy. Instead of spending hours researching keywords manually, this AI-powered tool delivers targeted keyword suggestions based on your specific criteria.


    What problem does this workflow solve?

    Keyword research is a time-consuming but essential part of SEO and content marketing. Many professionals struggle with:

    • Finding relevant keywords that match specific search intents
    • Balancing between short-tail and long-tail keywords
    • Generating comprehensive keyword lists that cover different aspects of a topic
    • Consistently identifying high-potential keywords for content creation

    What this workflow does

    This n8n workflow leverages AI to automatically generate a customized list of 15-20 high-potential keywords based on three simple inputs:

    • Topic – The main subject area you want keywords for
    • Search Intent – Choose between Navigational, Informational, Commercial, or Transactional
    • Keyword Type – Select Short-Tail or Long-Tail keywords

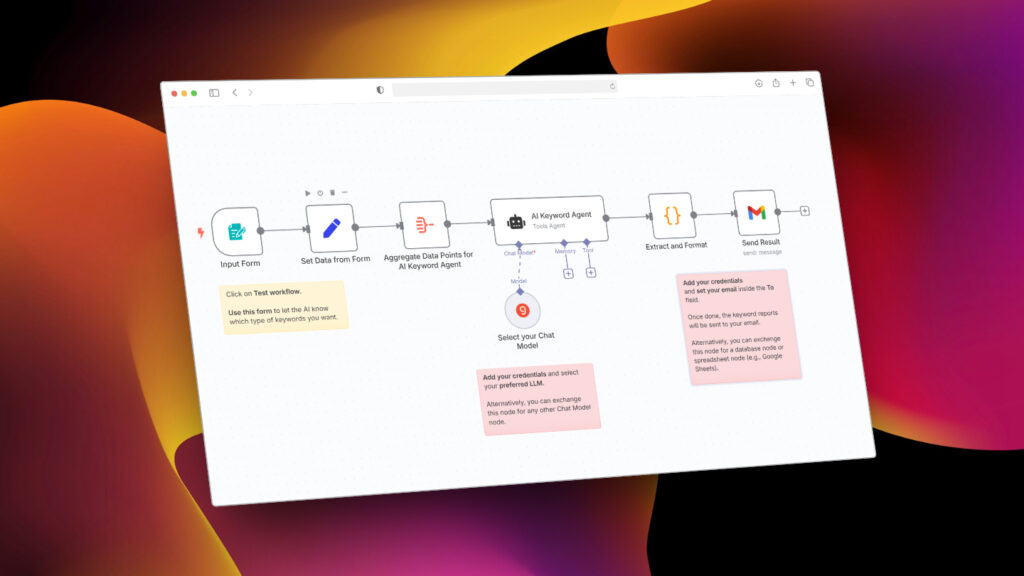
    The workflow processes your input through an AI language model that follows SEO best practices to generate relevant keywords. It then formats the results and delivers them directly to your email inbox, ready for use in your SEO strategy.

    Setup

    Setting up this workflow is straightforward:

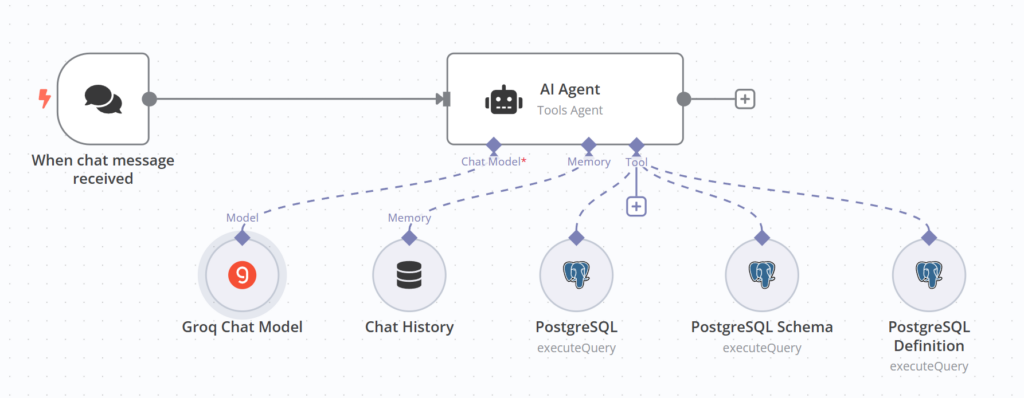
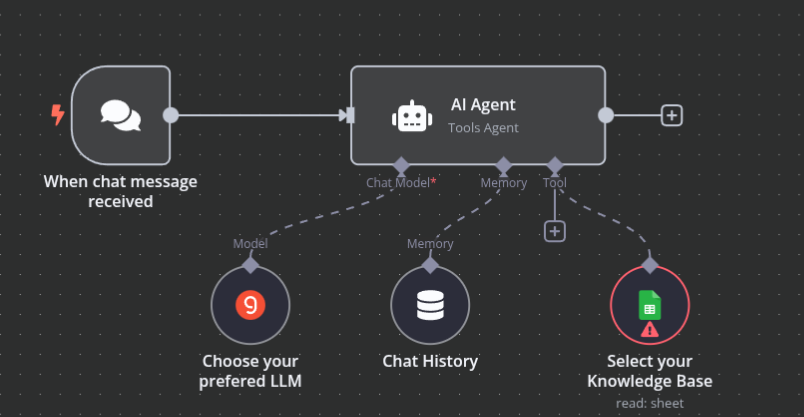
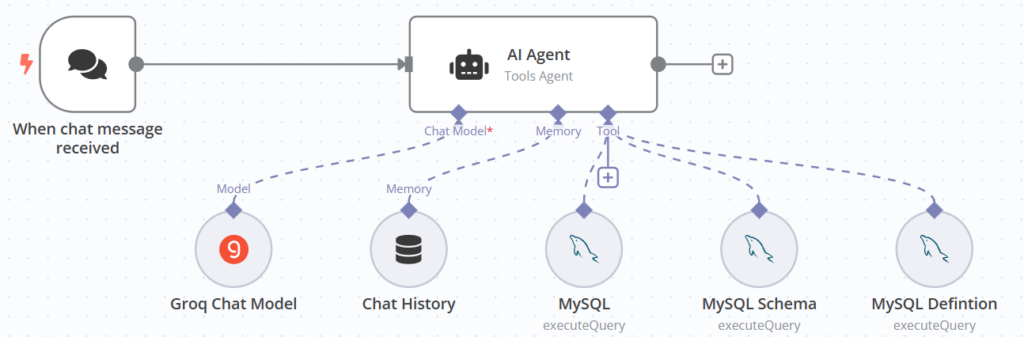
    1. Add your credentials for the AI language model in the “Select your Chat Model” node
    • Click on the node and connect your Groq account (and choose any LLM you want, like: OpenAI, Claude AI or Llama) or replace with another LLM provider
    1. Configure email delivery in the “Send Result” node
    • Update the “sendTo” parameter with your email address
    • Add your Gmail credentials or replace with your preferred email service
    1. Test your workflow by clicking the “Test Workflow” button
    • Use the form to enter your topic, search intent, and keyword type
    • Check your email for the generated keyword report
    1. Activate the workflow once testing is complete

    How to customize this workflow

    The template is highly adaptable to fit your specific needs:

    • Replace the email node with a database or spreadsheet node to store keywords
    • Modify the AI prompts in the “AI Keyword Agent” to adjust the keyword generation strategy
    • Add additional filtering nodes to further refine keywords based on custom criteria
    • Integrate with other SEO tools to analyze competition or search volume for generated keywords

    This workflow serves as a powerful starting point for automating your keyword research process, saving you valuable time while delivering consistent, high-quality results.

  • AI Chatbot with PostgreSQL Database

    This guide shows you how to deploy a chatbot that lets you query your PostgreSQL database using natural language. You will build a system that accepts chat messages, retains conversation history, constructs dynamic SQL queries, and returns responses generated by an AI model. By following these instructions, you will have a working solution that integrates n8n’s AI Agent capabilities with PostgreSQL.


    Prerequisites

    Before you begin, ensure that you have the following:

    • An active n8n instance (self-hosted or cloud) running version 1.50.0 or later.
    • Valid PostgreSQL credentials configured in n8n.
    • API credentials for the Groq Chat Model (or your preferred AI language model).
    • Basic familiarity with SQL (specifically PostgreSQL syntax) and n8n node concepts such as chat triggers and memory buffers.
    • Access to the n8n Docs on AI Agents for further reference.

    Workflow Setup

    1. Chat Interface & Trigger
      • When Chat Message Received: This node listens for incoming chat messages via a webhook. When a message arrives, it triggers the workflow immediately.
    2. Conversation Memory
      • Chat History: This memory buffer node stores the last 10 interactions. It supplies conversation context to the AI Agent, ensuring that responses consider previous messages.
    3. AI Agent Core
      • AI Agent (Tools Agent): The AI Agent node orchestrates the conversation by receiving the chat input and conversation history. It dynamically generates PostgreSQL-compatible SQL queries based on your requests and coordinates calls to external tools (such as PostgreSQL nodes).
    4. Database Interactions
      • PostgreSQL Node (Query Execution): This node executes the SQL query generated by the AI Agent against your PostgreSQL database. You reference the query using an expression (e.g., {{$node["AI Agent"].json.sql_query}}), allowing the agent’s output to control data retrieval.
      • PostgreSQL Node (Schema Retrieval): This node (or a dedicated step using the PostgreSQL node) retrieves a list of relevant tables from your PostgreSQL database (e.g., from the public schema, excluding system schemas like pg_catalog or information_schema). The agent uses this information to understand the available tables. This typically involves executing a query like SELECT table_name FROM information_schema.tables WHERE table_schema = 'public';.
      • PostgreSQL Node (Table Definition Retrieval): This node (or another dedicated step using the PostgreSQL node) fetches detailed metadata (such as column names, data types, and potentially relationships using foreign keys) for a specific table. The table name (and schema if necessary) is supplied dynamically by the AI Agent. This often involves querying information_schema.columns, e.g., SELECT column_name, data_type FROM information_schema.columns WHERE table_name = '{{dynamic_table_name}}' AND table_schema = 'public';.
    5. Language Model Processing
      • Groq Chat Model: This node connects to the Groq Chat API to generate text completions. It processes the combined input (chat message, context, and data fetched from PostgreSQL) and produces the final response.
    6. Guidance & Customization
      • Sticky Notes: These nodes provide guidance on:
        • Switching the chat model if you wish to use another provider (e.g., OpenAI or Anthropic).
        • Adjusting the maximum token count per interaction.
        • Customizing the SQL queries (ensuring PostgreSQL compatibility) and the context window size.
      • They help you modify the workflow to suit your environment and requirements.

    Workflow Connections

    • The Chat Trigger passes the incoming message to the AI Agent.
    • The Chat History node supplies conversation context to the AI Agent.
    • The AI Agent calls the PostgreSQL nodes as external tools, generating and sending dynamic SQL queries.
    • The Groq Chat Model processes the consolidated input from the agent and outputs the natural language response delivered to the user.

    Testing the Workflow

    1. Send a chat message using the chat interface.
    2. Observe how the AI Agent processes the input and generates a corresponding PostgreSQL SQL query.
    3. Verify that the PostgreSQL nodes execute the query correctly against your database and return data.
    4. Confirm that the Groq Chat Model produces a coherent natural language response based on the query results.
    5. Refer to the sticky notes for guidance if you need to fine-tune any node settings or SQL queries.

    Next Steps and References

    • Customize Your AI Model: Replace the Groq Chat Model with another language model (such as the OpenAI Chat Model) by updating the node credentials and configuration.
    • Enhance Memory Settings: Adjust the Chat History node’s context window to retain more or fewer messages based on your needs.
    • Modify SQL Queries: Update the SQL queries within the PostgreSQL nodes or refine the prompts for the AI Agent to ensure they match your specific database schema and desired data, adhering to PostgreSQL syntax.
    • Further Reading: Consult the n8n Docs on AI Agents for additional details and examples to expand your workflow’s capabilities.
    • Set Up a Website Chatbot: Copy & Paste and replace the placeholders in the following code to embed the chatbot into your personal or company’s website: View in CodePen 🡥

    By following these steps, you will deploy a robust AI chatbot workflow that integrates with your PostgreSQL database, allowing you to query data using natural language.

  • Website AI Customer Support Chatbot with Google Sheets Knowledge Base


    This workflow creates an AI-powered customer support chatbot with a Google Sheets knowledge base. Here’s a breakdown of how it works and how you can use it to handle customer requests:

    How the Workflow Functions

    1. Customer Interaction Entry Point: When a customer sends a message through your website chat interface, the “When chat message received” node captures this input.
    2. Context Management: The “Chat History” node maintains a record of the last 10 conversation exchanges, providing context for the AI to understand the ongoing conversation.
    3. AI Processing: The “AI Agent” node acts as the brain of the system, programmed to function as a support assistant. It’s configured to use the Google Sheets tool to retrieve relevant data based on customer requests.
    4. Language Model: The “Groq Chat Model” powers the AI’s language understanding and response generation capabilities.
    5. Knowledge Base Access: The “Google Sheets” node connects to your Google Sheets database, allowing the AI to look up specific information to answer customer queries.

    How to Use It for Customer Support

    1. Set Up Your Knowledge Base: Organize your support information in a Google Sheet with clear headers and structured data. For example:
    • Common questions and answers
    • Product specifications
    • Troubleshooting guides
    • Pricing information
    • Return policies
    1. Configure the Google Sheets Node: Connect it to your specific Google Sheet document and worksheet that contains your knowledge base.
    2. Deploy the Chatbot: Make the chat public and embed it on your website using the chat integration options.
    3. Customer Interaction Flow:
    • A customer sends a question through the chat
    • The AI agent processes the request
    • It searches the Google Sheets knowledge base for relevant information
    • It formulates a helpful response based on the retrieved data
    • The customer receives a contextually appropriate answer
    1. Monitor and Refine: Review chat logs periodically to identify common questions or knowledge gaps, then update your Google Sheets database accordingly.

    Template for website embedding: View on Codepen

    This workflow is particularly effective for handling routine inquiries that have standard responses stored in your knowledge base, freeing up your human support team to focus on more complex or unique customer issues.

  • How to build an AI-powered Email Responder (Gmail) – n8n Workflow Template


    This documentation outlines an enhanced n8n workflow designed to send emails with dynamic content. The workflow includes four key nodes: Start, Set, Send Email, and Sticky Note. By following the steps in this guide, you’ll set up an automated process that prepares an email with dynamic content and sends it using your preferred email provider.

    Prerequisites

    Before getting started, ensure you have the following:

    • An active n8n instance to import and modify workflows.
    • A valid email provider account. The current workflow is based on the built-in Email node, but adjustments can be made for providers like Gmail.
    • A basic understanding of n8n concepts, such as nodes, workflows, and expressions.

    Workflow Overview

    The workflow consists of four nodes:

    Start Node

    • This node triggers the workflow’s execution.
    • No configuration is required for this node.

    Set Node (“Set Email Content”)

    • This node creates a data property called content that stores the email body text.
    • The value in this node is passed on to the next node, which handles sending the email.

    Send Email Node

    • This node sends the email using the configured parameters.
    • The email body is retrieved using the expression {{$json["content"]}} from the previous node.
    • You need to configure the email parameters, such as sender email, recipient email, and subject.

    Sticky Note Node

    • This node serves as an internal note for documenting the workflow.
    • It does not affect workflow execution but can be updated with relevant information.

    How to Use the Workflow

    Import the Workflow into n8n

    1. Open your n8n editor.
    2. Import the workflow by pasting the provided JSON code.
    3. Save the workflow with a meaningful name (e.g., “Dynamic Email Sending Workflow”).

    Configure the Workflow Nodes

    1. Set Node:
      • Edit the content value with the desired email message.
    2. Send Email Node:
      • Update the sender’s email address (your-email@example.com).
      • Change the recipient’s email address (recipient@example.com).
      • Modify the subject line as needed.
      • If you’re using a different email provider, update the node’s configuration accordingly.

    Activate and Test the Workflow

    1. Activate the workflow to enable automatic triggers.
    2. Run a test and check the execution logs to ensure the email is sent correctly.
    3. Confirm that the email body matches the content set in the Set node.

    Next Steps and References

    Customize for Other Email Providers

    • If using Gmail or a different provider, replace the Email node with the corresponding service node (e.g., Gmail node).
    • Update the authentication and configuration settings to match your provider.

    Expand the Workflow Functionality

    • Add additional nodes, such as Conditional or Function nodes, to process data before sending the email.
    • Integrate with other services or APIs to enhance the workflow’s capabilities.

    Learn More About n8n

    • Visit the n8n documentation for detailed guides and examples.
    • Explore additional workflow examples and discussions in the n8n community forums.

    By following these instructions, you’ll have a dynamic email-sending workflow set up in n8n, ready to be customized and expanded to meet your specific needs.

  • How to build an AI Chatbot – n8n Workflow Template

    Below is a step-by-step guide on how to build an AI Chatbot in n8n using the workflow template shown in your image. This example uses the Groq Chat Model node (though you could also use other LLMs or AI model nodes) and demonstrates storing conversation history in a MySQL database. You can adapt these steps to any other SQL or NoSQL database you prefer.


    Overview of the Workflow

    1. Trigger: “When chat message is received”
      • This node will listen for incoming messages (e.g., from a chatbot interface on your website).
    2. Groq Chat Model
      • The AI model node that generates a response based on the user’s message (and optionally prior context).
    3. Chat History
      • Manages the memory of the conversation (how many tokens or messages you keep in context).
    4. AI Agent
      • A logic or “router” node that determines how to handle the AI’s response (for instance, storing it, sending it back, etc.).
    5. MySQL
      • Stores the conversation data, user info, or any other information you’d like to keep for future reference.
    6. MySQL Schema & MySQL Definition
      • These nodes define or reference the structure of your MySQL database tables and fields.
    7. Response to the User
      • Typically, you’ll have a final step (e.g., an HTTP Response node) that sends the AI’s reply back to the user’s chat interface.

    Prerequisites

    • n8n installed and running (locally or on a server).
    • Groq Chat Model (or another AI model node) credentials set up in n8n.
    • MySQL database running and accessible to n8n (or a different database if you prefer).
    • Credentials for your database configured in n8n.

    Step 1: Set Up Your Trigger

    1. Add a Trigger Node
      • In your n8n canvas, add a node that triggers when a new chat message is received.
      • If you’re embedding this on a website, you might use an HTTP Request node or Webhook node that captures the user’s message.
    2. Configure the Trigger
      • Specify the endpoint or connection details so that whenever a user sends a message in your chat interface, it arrives here.
      • Test by sending a sample request/message to ensure n8n is receiving it.

    Step 2: Connect to the Groq Chat Model (or Your Preferred AI Model)

    1. Add the Groq Chat Model Node
      • In the Groq Chat Model node, set your model credentials and configuration.
      • Configure concurrency if you expect multiple simultaneous users.
    2. Passing the Prompt
      • Map the user’s message from the trigger node into the Groq Chat Model node’s “prompt” or “input” field.
      • Optionally, you can include system instructions (like the chatbot’s persona or guidelines) in the node configuration.
    3. Tokens and Concurrency
      • Adjust the maximum tokens setting if your conversation or responses tend to be long.
      • Increase concurrency to handle multiple requests in parallel if needed.

    Step 3: Add a Chat History Node

    1. Insert Chat History Node
      • Connect the output of the Groq Chat Model to the Chat History node.
      • This node manages how much of the conversation is remembered.
    2. Configure the Chat History
      • Decide whether you want to pass the entire conversation or only the last message to the next node.
      • Set how many tokens (or messages) you want to store, so the model can keep context of previous user queries and AI responses.
    3. Pass the Updated History
      • The Chat History node will output the user’s current message plus the conversation context. This can be fed back into the Groq Chat Model on subsequent turns, ensuring context is maintained.

    Step 4: AI Agent Node

    1. Add the AI Agent Node
      • This node is optional if you want to incorporate additional logic or branching after the model generates a response.
      • It can serve as a router to decide whether to store data, perform certain actions, or modify the response before sending it back.
    2. Configure AI Agent Logic
      • For instance, you might have conditions such as “If the user asks about X, fetch data from the database first.”
      • Or “If the user wants to store new info, call the MySQL node to insert data.”

    Step 5: Connect to MySQL (or Your Preferred Database)

    1. Add the MySQL Node
      • Provide your MySQL credentials and server details in the node’s credentials.
    2. Define Your Schema
      • The MySQL Schema and MySQL Definition nodes help structure how data is stored (e.g., user ID, message content, timestamp).
      • Example fields:
        • id (primary key)
        • user_id
        • user_message
        • ai_response
        • timestamp
    3. Insert or Select Data
      • In the MySQL node, set the Operation to Insert if you want to store new chat messages.
      • Use Select if you need to retrieve stored data to provide context to the AI model (e.g., user’s preferences).
    4. Map Data
      • Map the user’s message and AI response into the appropriate fields.
      • For example, you might pass {{$json["message"]}} to the user_message column, and {{$json["response"]}} to the ai_response column.

    Step 6: Return the AI’s Response to the User

    1. Add a Response Node
      • Typically, you’d add an HTTP Response node or use a final step in your messaging platform node to send the AI’s response back.
      • Map the AI response from either the Groq Chat Model node or the AI Agent node into the response field.
    2. Testing
      • Send a test message from your chat interface or via a tool like cURL or Postman.
      • Confirm that the AI’s response is returned successfully and that data is inserted into your MySQL table.

    Step 7: Embed the Chatbot in Your Website (Optional)

    1. Create a Front-End Interface
      • You can build a simple chat box on your site using HTML/JavaScript or a framework like React/Vue.
      • The chat box should send messages to your n8n Webhook (the same one used in the trigger node).
    2. Make the Workflow Public
      • If you want external access, ensure your n8n instance is publicly accessible.
      • You can secure it with an API key or other authentication methods.
    3. Test in Production
      • Send messages from your website’s chat box.
      • Check logs in n8n to ensure messages are flowing through the workflow and responses are coming back.

    Tips and Best Practices

    • Security: Always secure your n8n endpoints. Use environment variables or n8n’s credential manager to store API keys and database credentials.
    • Conversation Length: Keep an eye on token usage to avoid hitting API or model limits. Adjust the chat history to store fewer messages if needed.
    • Database Maintenance: If you store all conversations, consider a cleanup mechanism or an archive strategy.
    • Scaling: If you expect high traffic, ensure concurrency settings and server resources are sufficient. You may also want to add caching layers or handle concurrency in your database.
    • Customization: You can integrate other nodes in n8n to perform tasks (e.g., sending emails, retrieving data from external APIs) based on the user’s query.

    Conclusion

    By following these steps, you’ll have a functional AI Chatbot workflow in n8n that:

    1. Receives a message from a user.
    2. Passes it to the Groq Chat Model (or your AI model of choice).
    3. Maintains conversation context with the Chat History node.
    4. Optionally routes through an AI Agent for further logic.
    5. Stores or retrieves data in MySQL.
    6. Sends the AI’s response back to the user.

    This setup gives you a powerful and flexible platform to customize your chatbot’s behavior, maintain user context, and integrate with any data source you need. Feel free to add more logic nodes or custom scripts to further enhance your chatbot’s capabilities.