Below is a step-by-step guide on how to build an AI Chatbot in n8n using the workflow template shown in your image. This example uses the Groq Chat Model node (though you could also use other LLMs or AI model nodes) and demonstrates storing conversation history in a MySQL database. You can adapt these steps to any other SQL or NoSQL database you prefer.
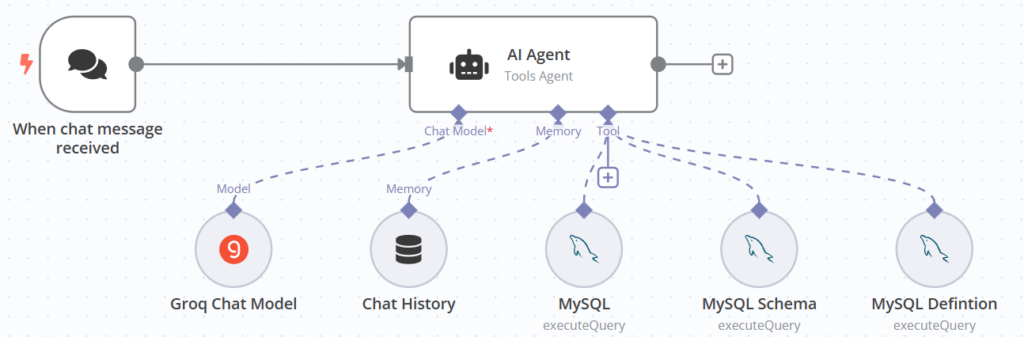
Overview of the Workflow
- Trigger: “When chat message is received”
- This node will listen for incoming messages (e.g., from a chatbot interface on your website).
- Groq Chat Model
- The AI model node that generates a response based on the user’s message (and optionally prior context).
- Chat History
- Manages the memory of the conversation (how many tokens or messages you keep in context).
- AI Agent
- A logic or “router” node that determines how to handle the AI’s response (for instance, storing it, sending it back, etc.).
- MySQL
- Stores the conversation data, user info, or any other information you’d like to keep for future reference.
- MySQL Schema & MySQL Definition
- These nodes define or reference the structure of your MySQL database tables and fields.
- Response to the User
- Typically, you’ll have a final step (e.g., an HTTP Response node) that sends the AI’s reply back to the user’s chat interface.
Prerequisites
- n8n installed and running (locally or on a server).
- Groq Chat Model (or another AI model node) credentials set up in n8n.
- MySQL database running and accessible to n8n (or a different database if you prefer).
- Credentials for your database configured in n8n.
Step 1: Set Up Your Trigger
- Add a Trigger Node
- In your n8n canvas, add a node that triggers when a new chat message is received.
- If you’re embedding this on a website, you might use an HTTP Request node or Webhook node that captures the user’s message.
- Configure the Trigger
- Specify the endpoint or connection details so that whenever a user sends a message in your chat interface, it arrives here.
- Test by sending a sample request/message to ensure n8n is receiving it.
Step 2: Connect to the Groq Chat Model (or Your Preferred AI Model)
- Add the Groq Chat Model Node
- In the Groq Chat Model node, set your model credentials and configuration.
- Configure concurrency if you expect multiple simultaneous users.
- Passing the Prompt
- Map the user’s message from the trigger node into the Groq Chat Model node’s “prompt” or “input” field.
- Optionally, you can include system instructions (like the chatbot’s persona or guidelines) in the node configuration.
- Tokens and Concurrency
- Adjust the maximum tokens setting if your conversation or responses tend to be long.
- Increase concurrency to handle multiple requests in parallel if needed.
Step 3: Add a Chat History Node
- Insert Chat History Node
- Connect the output of the Groq Chat Model to the Chat History node.
- This node manages how much of the conversation is remembered.
- Configure the Chat History
- Decide whether you want to pass the entire conversation or only the last message to the next node.
- Set how many tokens (or messages) you want to store, so the model can keep context of previous user queries and AI responses.
- Pass the Updated History
- The Chat History node will output the user’s current message plus the conversation context. This can be fed back into the Groq Chat Model on subsequent turns, ensuring context is maintained.
Step 4: AI Agent Node
- Add the AI Agent Node
- This node is optional if you want to incorporate additional logic or branching after the model generates a response.
- It can serve as a router to decide whether to store data, perform certain actions, or modify the response before sending it back.
- Configure AI Agent Logic
- For instance, you might have conditions such as “If the user asks about X, fetch data from the database first.”
- Or “If the user wants to store new info, call the MySQL node to insert data.”
Step 5: Connect to MySQL (or Your Preferred Database)
- Add the MySQL Node
- Provide your MySQL credentials and server details in the node’s credentials.
- Define Your Schema
- The MySQL Schema and MySQL Definition nodes help structure how data is stored (e.g., user ID, message content, timestamp).
- Example fields:
id(primary key)user_iduser_messageai_responsetimestamp
- Insert or Select Data
- In the MySQL node, set the Operation to Insert if you want to store new chat messages.
- Use Select if you need to retrieve stored data to provide context to the AI model (e.g., user’s preferences).
- Map Data
- Map the user’s message and AI response into the appropriate fields.
- For example, you might pass
{{$json["message"]}}to theuser_messagecolumn, and{{$json["response"]}}to theai_responsecolumn.
Step 6: Return the AI’s Response to the User
- Add a Response Node
- Typically, you’d add an HTTP Response node or use a final step in your messaging platform node to send the AI’s response back.
- Map the AI response from either the Groq Chat Model node or the AI Agent node into the response field.
- Testing
- Send a test message from your chat interface or via a tool like cURL or Postman.
- Confirm that the AI’s response is returned successfully and that data is inserted into your MySQL table.
Step 7: Embed the Chatbot in Your Website (Optional)
- Create a Front-End Interface
- You can build a simple chat box on your site using HTML/JavaScript or a framework like React/Vue.
- The chat box should send messages to your n8n Webhook (the same one used in the trigger node).
- Make the Workflow Public
- If you want external access, ensure your n8n instance is publicly accessible.
- You can secure it with an API key or other authentication methods.
- Test in Production
- Send messages from your website’s chat box.
- Check logs in n8n to ensure messages are flowing through the workflow and responses are coming back.
Tips and Best Practices
- Security: Always secure your n8n endpoints. Use environment variables or n8n’s credential manager to store API keys and database credentials.
- Conversation Length: Keep an eye on token usage to avoid hitting API or model limits. Adjust the chat history to store fewer messages if needed.
- Database Maintenance: If you store all conversations, consider a cleanup mechanism or an archive strategy.
- Scaling: If you expect high traffic, ensure concurrency settings and server resources are sufficient. You may also want to add caching layers or handle concurrency in your database.
- Customization: You can integrate other nodes in n8n to perform tasks (e.g., sending emails, retrieving data from external APIs) based on the user’s query.
Conclusion
By following these steps, you’ll have a functional AI Chatbot workflow in n8n that:
- Receives a message from a user.
- Passes it to the Groq Chat Model (or your AI model of choice).
- Maintains conversation context with the Chat History node.
- Optionally routes through an AI Agent for further logic.
- Stores or retrieves data in MySQL.
- Sends the AI’s response back to the user.
This setup gives you a powerful and flexible platform to customize your chatbot’s behavior, maintain user context, and integrate with any data source you need. Feel free to add more logic nodes or custom scripts to further enhance your chatbot’s capabilities.
Leave a Reply