Tag: Google Sheets

  • Website AI Customer Support Chatbot with Google Sheets Knowledge Base


    This workflow creates an AI-powered customer support chatbot with a Google Sheets knowledge base. Here’s a breakdown of how it works and how you can use it to handle customer requests:

    How the Workflow Functions

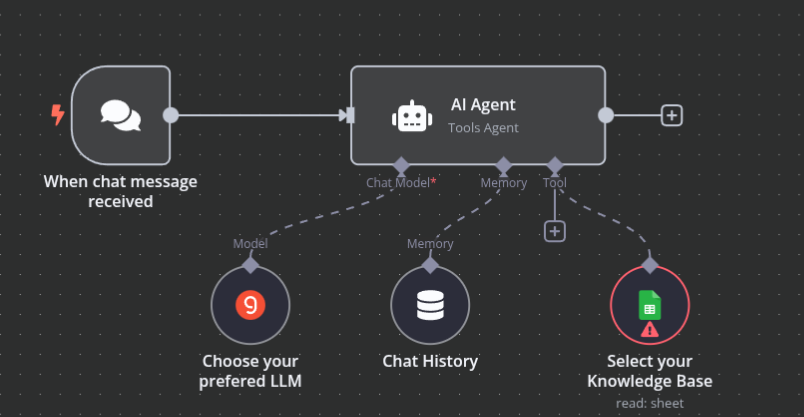
    1. Customer Interaction Entry Point: When a customer sends a message through your website chat interface, the “When chat message received” node captures this input.
    2. Context Management: The “Chat History” node maintains a record of the last 10 conversation exchanges, providing context for the AI to understand the ongoing conversation.
    3. AI Processing: The “AI Agent” node acts as the brain of the system, programmed to function as a support assistant. It’s configured to use the Google Sheets tool to retrieve relevant data based on customer requests.
    4. Language Model: The “Groq Chat Model” powers the AI’s language understanding and response generation capabilities.
    5. Knowledge Base Access: The “Google Sheets” node connects to your Google Sheets database, allowing the AI to look up specific information to answer customer queries.

    How to Use It for Customer Support

    1. Set Up Your Knowledge Base: Organize your support information in a Google Sheet with clear headers and structured data. For example:
    • Common questions and answers
    • Product specifications
    • Troubleshooting guides
    • Pricing information
    • Return policies
    1. Configure the Google Sheets Node: Connect it to your specific Google Sheet document and worksheet that contains your knowledge base.
    2. Deploy the Chatbot: Make the chat public and embed it on your website using the chat integration options.
    3. Customer Interaction Flow:
    • A customer sends a question through the chat
    • The AI agent processes the request
    • It searches the Google Sheets knowledge base for relevant information
    • It formulates a helpful response based on the retrieved data
    • The customer receives a contextually appropriate answer
    1. Monitor and Refine: Review chat logs periodically to identify common questions or knowledge gaps, then update your Google Sheets database accordingly.

    Template for website embedding: View on Codepen

    This workflow is particularly effective for handling routine inquiries that have standard responses stored in your knowledge base, freeing up your human support team to focus on more complex or unique customer issues.

  • How to build an AI-powered Email Responder (Gmail) – n8n Workflow Template


    This documentation outlines an enhanced n8n workflow designed to send emails with dynamic content. The workflow includes four key nodes: Start, Set, Send Email, and Sticky Note. By following the steps in this guide, you’ll set up an automated process that prepares an email with dynamic content and sends it using your preferred email provider.

    Prerequisites

    Before getting started, ensure you have the following:

    • An active n8n instance to import and modify workflows.
    • A valid email provider account. The current workflow is based on the built-in Email node, but adjustments can be made for providers like Gmail.
    • A basic understanding of n8n concepts, such as nodes, workflows, and expressions.

    Workflow Overview

    The workflow consists of four nodes:

    Start Node

    • This node triggers the workflow’s execution.
    • No configuration is required for this node.

    Set Node (“Set Email Content”)

    • This node creates a data property called content that stores the email body text.
    • The value in this node is passed on to the next node, which handles sending the email.

    Send Email Node

    • This node sends the email using the configured parameters.
    • The email body is retrieved using the expression {{$json["content"]}} from the previous node.
    • You need to configure the email parameters, such as sender email, recipient email, and subject.

    Sticky Note Node

    • This node serves as an internal note for documenting the workflow.
    • It does not affect workflow execution but can be updated with relevant information.

    How to Use the Workflow

    Import the Workflow into n8n

    1. Open your n8n editor.
    2. Import the workflow by pasting the provided JSON code.
    3. Save the workflow with a meaningful name (e.g., “Dynamic Email Sending Workflow”).

    Configure the Workflow Nodes

    1. Set Node:
      • Edit the content value with the desired email message.
    2. Send Email Node:
      • Update the sender’s email address (your-email@example.com).
      • Change the recipient’s email address (recipient@example.com).
      • Modify the subject line as needed.
      • If you’re using a different email provider, update the node’s configuration accordingly.

    Activate and Test the Workflow

    1. Activate the workflow to enable automatic triggers.
    2. Run a test and check the execution logs to ensure the email is sent correctly.
    3. Confirm that the email body matches the content set in the Set node.

    Next Steps and References

    Customize for Other Email Providers

    • If using Gmail or a different provider, replace the Email node with the corresponding service node (e.g., Gmail node).
    • Update the authentication and configuration settings to match your provider.

    Expand the Workflow Functionality

    • Add additional nodes, such as Conditional or Function nodes, to process data before sending the email.
    • Integrate with other services or APIs to enhance the workflow’s capabilities.

    Learn More About n8n

    • Visit the n8n documentation for detailed guides and examples.
    • Explore additional workflow examples and discussions in the n8n community forums.

    By following these instructions, you’ll have a dynamic email-sending workflow set up in n8n, ready to be customized and expanded to meet your specific needs.